What the Heck Is Intaglio Printmaking?
Sigh. If I were to tell you everything about Intaglio printmaking, we would be here for weeks.
Instead let me tell you the basics about the methods that I use most.
A "print" is an ORIGINAL piece of art. It is not a reproduction, giclee, or photocopy as you will learn by reading below.
It takes a lot of hard work and skill...and holding my tongue the right way!
Instead let me tell you the basics about the methods that I use most.
A "print" is an ORIGINAL piece of art. It is not a reproduction, giclee, or photocopy as you will learn by reading below.
It takes a lot of hard work and skill...and holding my tongue the right way!

Intaglio Prints
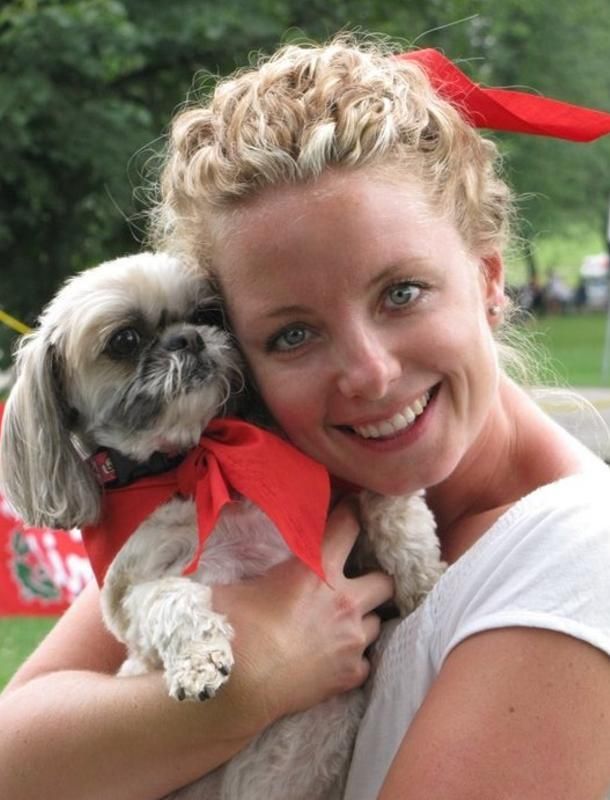
For producing my Intaglio prints, I use what is called a drypoint needle.
I take an image and etch it onto plexiglass or zinc plates. Depending on the complexity of the image, it can take multiple hours to complete just one. Then comes the fun part. Before you use the plate (to be totally cool I will call it "The Matrix") all edges must be filed to a 45 degree angle. Pay special attention to the corners so it will not rip the paper that it is to be printed on. The paper needs to soak in water for several minutes, depending on its kind. Then, it needs to be blotted with clean newsprint or blotting paper, using a towel to remove excess water.
OOPS.. I am getting ahead of myself. The Matrix (Did I mention how cool I am?) must be hand inked with etching ink. Colours must be hand mixed and applied so the ink gets into the etching marks that I created on the plate. I will warn you now: This part is REALLY messy. Excessive ink must then be wiped off with cheesecloth, or a fabric called tarlatan or . crinoline. Crinoline is like a starched cheesecloth and is the fabric that makes prom and wedding dresses poofy. Add needed tonal values with cotton swabs (i.e. rubbing any sections which will be white). This step may take an hour or so.
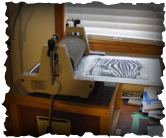
Okay... next is the printing process. The picture at the top of this page is a printing press. The plate that you just
inked needs to be registered properly: straight with the same amount of width surrounding it and placed on what is called
the press bed. The paper that you had soaking now needs to be placed on gently and precisely over top of that plate. Protect it with a felt blanket.
Adjustments must be now made for pressure for whatever intensity you would like your image to be.This is usually trial
and error. You have to roll the plate and paper through the press using the press wheel. When you are done,
remove the paper from the plate and you have your image. The image must be placed flat with a board on top for
pressure so it dries flat and wrinkle free.
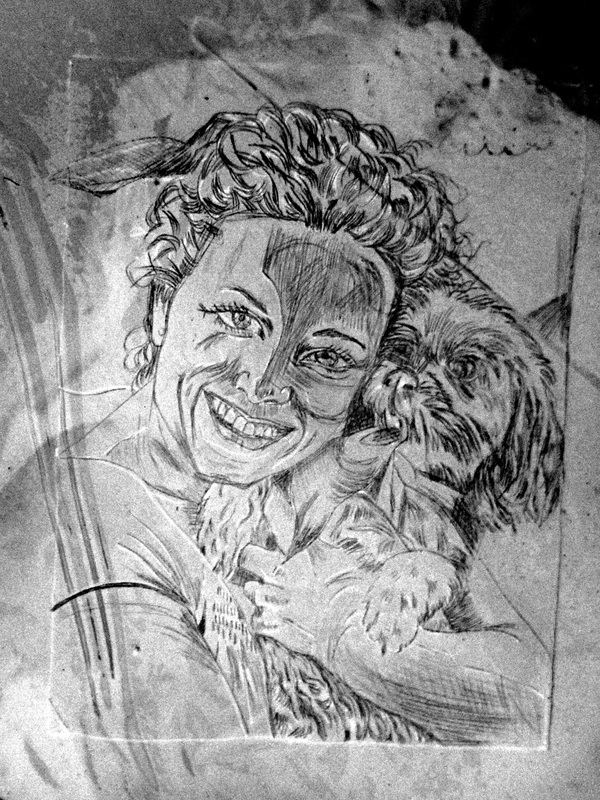
I feel I need to mention too that there is a lot of thought that needs to go into a drypoint. All letters and numbers
must be backwards, for the plate will print a mirror image. Bear this mind when you are printing an image that portrays
something from real life. What is left is right and vice verse.
This process is done for each image made, making them completely original and unique- it is impossible to get two
prints exactly the same. This is also why there are so many print collectors out there and why intaglio prints can be
so expensive.
I take an image and etch it onto plexiglass or zinc plates. Depending on the complexity of the image, it can take multiple hours to complete just one. Then comes the fun part. Before you use the plate (to be totally cool I will call it "The Matrix") all edges must be filed to a 45 degree angle. Pay special attention to the corners so it will not rip the paper that it is to be printed on. The paper needs to soak in water for several minutes, depending on its kind. Then, it needs to be blotted with clean newsprint or blotting paper, using a towel to remove excess water.
OOPS.. I am getting ahead of myself. The Matrix (Did I mention how cool I am?) must be hand inked with etching ink. Colours must be hand mixed and applied so the ink gets into the etching marks that I created on the plate. I will warn you now: This part is REALLY messy. Excessive ink must then be wiped off with cheesecloth, or a fabric called tarlatan or . crinoline. Crinoline is like a starched cheesecloth and is the fabric that makes prom and wedding dresses poofy. Add needed tonal values with cotton swabs (i.e. rubbing any sections which will be white). This step may take an hour or so.
Okay... next is the printing process. The picture at the top of this page is a printing press. The plate that you just
inked needs to be registered properly: straight with the same amount of width surrounding it and placed on what is called
the press bed. The paper that you had soaking now needs to be placed on gently and precisely over top of that plate. Protect it with a felt blanket.
Adjustments must be now made for pressure for whatever intensity you would like your image to be.This is usually trial
and error. You have to roll the plate and paper through the press using the press wheel. When you are done,
remove the paper from the plate and you have your image. The image must be placed flat with a board on top for
pressure so it dries flat and wrinkle free.
I feel I need to mention too that there is a lot of thought that needs to go into a drypoint. All letters and numbers
must be backwards, for the plate will print a mirror image. Bear this mind when you are printing an image that portrays
something from real life. What is left is right and vice verse.
This process is done for each image made, making them completely original and unique- it is impossible to get two
prints exactly the same. This is also why there are so many print collectors out there and why intaglio prints can be
so expensive.